

Kiro · 10 min read
The Pipeline Behind My Demo Videos Is Now Open Source
 Stefan Christoph
On this page
make demo to a 78-second MP4 on my machine.This post is the write-up I offered at the end of the cloned-voice post in June [3]. The code has been public for a few weeks now, so here is how it works and how you run it.
How it started
In May I wrote about HTTP 402, the status code that waited thirty years for a payment mechanism [4]. The discussion afterwards pushed me to build the thing: a research agent with a $1 budget that buys articles from competing publishers [2]. That post came with a short walkthrough video, narrated by Amazon Polly. The video drew questions of its own, and a few people said the narration sounded like a robot.
So I laid a new narration over the same screen recording, my own voice, cloned by an open-weights Qwen3-TTS model running on Amazon SageMaker [3]. That post closed by saying the recording pipeline might be worth its own piece, because keeping the voice in sync with the screen is the harder problem. Enough people asked how the videos are made that I pulled the pipeline out of my own setup and published it as demo-video-pipeline [1]. Since then I’ve used it to narrate walkthrough videos for demos AWS presented at IBC 2026 in Amsterdam [11].
Timing the recording to the audio
The usual way to narrate a screen recording is to record the screen and then line up the voiceover with delays. That works until the voice changes, because a different voice, or the same text synthesized a second time, gives you segments of different lengths, and every mismatch shifts the rest of the narration. So this pipeline synthesizes the voice first and records the screen to fit it.

The durations arrow is the whole trick: the recorder is told how long each scene must last before it starts.
- A narration script (
narration.json) lists segments. Each has the words to say and the UI steps to run while they’re spoken: type into a field, click, call a small hook in the page, or wait. - The TTS step synthesizes one WAV per segment.
ffprobemeasures each WAV.- A Playwright recorder opens the app, waits for a short lead-in, then runs each segment’s steps and sleeps for whatever is left of that segment’s measured duration. Playwright records the browser context to video [10].
- ffmpeg joins the WAVs back-to-back, delays them by the lead-in, and lays them over the recording.
Each scene lasts as long as its audio, so there’s no per-segment offset arithmetic to do. And timing can’t drift from one segment into the next, as long as each segment’s steps finish inside its audio. A step that runs over isn’t caught; it shows up in the log as an actual time above the target. The README calls this the fixed-pause method [1].
This depends on the app responding in a predictable time, which is true for the static sample app. If you want to re-voice a capture you already have, or record an app that waits on a network, the repo has a second method. retime cuts the existing capture into one scene per segment at boundary timestamps you provide, then pads or trims each scene to its new narration length [1]. Finding those boundaries is manual work, from ffmpeg scene detection or from the frames themselves.
Three voices, chosen by what you want to deploy
Measuring the audio first turns the voice into a parameter. In June, switching from Amazon Polly to my cloned voice meant re-timing an existing capture [3]. Here the timing comes from the audio, so changing the voice is a different prompt and a fresh render. The backends are ordered by barrier to entry [1]:
| Backend | What it needs | What you get |
|---|---|---|
| Amazon Polly (default) | AWS credentials with polly:SynthesizeSpeech | A neural voice from a managed API, no deployment |
| Qwen3-TTS named speaker | An asynchronous Amazon SageMaker endpoint you deploy | An open-weights voice you host yourself |
| Qwen3-TTS voice clone | The same endpoint plus a short reference clip of your voice | The demo in your own voice |
Amazon Polly is the default because nothing has to be deployed or torn down. The pipeline calls SynthesizeSpeech with the neural engine and the Matthew voice, and switching to Joanna, Ruth or Stephen is one setting [1] [6].
Both Qwen3-TTS backends share one endpoint. Qwen3-TTS is released under Apache-2.0, and its Base model is described as capable of voice cloning from a few seconds of audio [7]. The repo deploys it on an asynchronous SageMaker endpoint that scales to zero instances when idle, so you pay for the GPU instance only while it processes a request [8]. Plan on roughly 15 to 25 minutes for the first deploy, on an ml.g5.xlarge, according to the README [1]. After that the endpoint stays, and you reuse it across renders. A backlog target-tracking policy won’t wake an endpoint at zero for a single queued request (I ran into exactly this in June [3]), so you either add the scale-up-from-zero policy from the SageMaker docs [9] or raise the minimum capacity to 1 for the render and set it back to 0 afterwards. The README also suggests setting the desired count to 1, which the target-tracking policy can undo.
For cloning, the repo walks you through recording a reference clip, transcribing it with Amazon Transcribe, and confirming the transcript, because the repo’s in-context cloning passes the clip’s exact words along with the audio [1] [7]. The Voice Sample Studio post covers what makes a good clip and why I built a small tool to grade mine [12], and the cloned-voice post covers the ethics of cloning a voice, including your own [3].
Running it from Kiro CLI
The repo ships a Kiro CLI agent (.kiro/agents/demo-video-pipeline.json) and a skill (.kiro/skills/demo-video/SKILL.md) [1]. The agent loads the skill and shells out to the repo’s own Makefile and Python scripts, the same ones you’d run by hand; it does not reimplement anything. The skill tells it which defaults to pick and when to warn you about cost before it deploys an endpoint. It also says never to tear the endpoint down on its own.
Install Kiro CLI first. The installation page lists the options, one of which is the install script curl -fsSL https://cli.kiro.dev/install | bash [5]. Then:
git clone https://github.com/stechr/schristoph-blog-samples.git
cd schristoph-blog-samples/demo-video-pipeline
kiro-cli chat --agent demo-video-pipeline
and ask, in plain language:
- “Generate a narrated demo video of the sample app.” (Amazon Polly)
- “Now let’s use the Qwen model for the voice.” (deploys the endpoint once, after a warning)
- “Let’s clone my voice and re-record the video in my voice.”
- “Make a script from my own app in ./my-app and render that.”
The last prompt is the one I use most. make script-from-app extracts facts from the app’s source and writes a prompt file, the agent writes the narration from it with its own model, and then it asks you to confirm the wording before rendering [1]. That’s how the bundled sample script was written. You also need to give your own app’s interactive elements data-testid attributes, because the recorder’s steps refer to them. As shipped, the recorder opens the app from a local index.html named in the script. A served app, on localhost or a staging URL, needs the page.goto line in record.py pointed at that URL, and an app behind a login needs the recorder to sign in first, for example from a saved Playwright session, which holds live credentials and stays out of the repo.
If you’d rather not use an agent, every step is a plain make target. make setup builds a virtual environment and installs the Chromium recorder, and make demo renders the sample with Amazon Polly [1].
What one run looks like
To check that the published repo still works as described, I ran the default path on a Linux machine on 5 November 2026: a fresh clone, make setup, then make demo with Amazon Polly in eu-central-1. I didn’t re-run the two Qwen3-TTS paths for this post, so what I say about them comes from the repo and the June post.
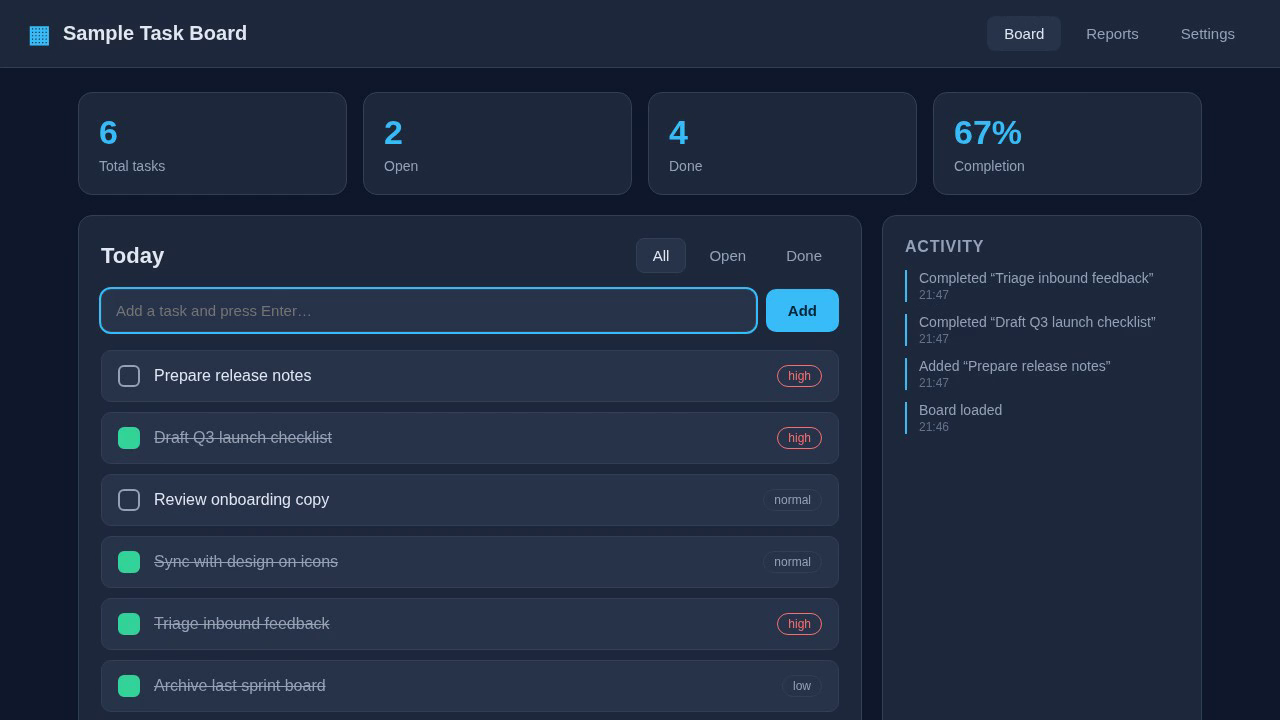
A frame from the generated video, after the recorder added a task and checked two off. All data in the sample app is fictional.
The seven segments came back between 7.4 and 12.1 seconds long. Together that’s 71.8 seconds of narration. The recorder’s own log, timed on its clock rather than measured in the video, put each scene at its target length to the hundredth of a second. make demo took 87 seconds of wall-clock time, synthesis, recording and stitching included. Out came a 1280x720 MP4, 77.8 seconds long.
I also checked the sync from the outside. Running ffmpeg scene detection on the screen capture, the first on-screen change in each scene with an action (typing the task, then the first check-off and the first filter click) appeared between 0.44 and 0.51 seconds after its narration segment started. The offset stayed the same from the first of those scenes to the last, so it didn’t build up over this run. Most likely it’s the time the page takes to load before the recorder starts its lead-in, because that time is in the video but not in the audio delay. A narrator who says “I’ll type a new task” half a second before the typing starts sounds natural, so I left it, and that offset is the number to tune if your demo needs it tighter.
The renderer’s own estimate was 75.8 seconds, and the file is 2 seconds longer, which fits the same explanation: the video also contains the page load at the start and the browser closing at the end.
What it’s good for
The pipeline is built for short, scripted product walkthroughs where you control the app. It’s a poor fit for live demos against systems with variable latency (unless you record once and use retime), and what comes out is one continuous take, with no editing or captions. And a weak script gives you a weak narration, which is why the skill makes the agent show you the wording before it renders.
The code is MIT licensed and the sample app has no branding. The README covers the manual path and the teardown in detail [1]. Made a demo with it? I’d like to see what you pointed it at.
Sources
[1] demo-video-pipeline, README and source (schristoph-blog-samples): architecture, backends, make targets, fixed-pause and retime methods, Kiro agent and skill, license.
[2] I Built the Agent That Pays — Here’s What I Learned: the agent-payments demo with the Amazon Polly-narrated walkthrough.
[3] From a Generic Voice to My Own: Self-Hosting a TTS Model on Amazon SageMaker: the same demo in a cloned voice, the async endpoint and the scale-from-zero gotcha.
[4] HTTP 402: The 30-Year Placeholder That AI Agents Finally Activated: where the series started.
[5] Kiro: Installation: the Kiro CLI install script.
[6] Amazon Polly API Reference: SynthesizeSpeech: engines and voice IDs.
[7] Qwen3-TTS (QwenLM on GitHub): model family, Apache-2.0 license, voice-clone Base model.
[8] Amazon SageMaker AI: Asynchronous inference: queued requests, scale to zero, pay while processing.
[9] Amazon SageMaker AI: Autoscale an asynchronous endpoint: MinCapacity 0 and the optional scale-up-from-zero policy.
[10] Playwright for Python: Videos: recording a browser context to video.
[11] AWS IBC 2026 Demo Showcase (PDF): the demos AWS showed at IBC 2026, RAI Amsterdam, 11–14 September 2026.
[12] Your Voice Clone Is Only as Good as the Reference Clip: grading reference clips before cloning.
❤ Created with the support of AI (Kiro)